
Every time I use Spotify it seems to use at least 80% of my disk. It gets quite annoying when I'm playing a game or trying to do anything on my own computer. This is a music app, not downloading/saving/writing music to your disk app. Since I don't have premium, it shouldn't record songs, or record anything on my disk. Since I listen to the same songs, I never listen to anything new. But seriously, why are you taking all my records?
Many Spotify users suffer from high disk usage issues when playing songs on the desktop Spotify app. Some even have their disk 100% occupied when Spotify is on. You can find solutions on the Internet, but this problem may return. Could there be better ways to solve the problem?
Yes, in the following sections, I will compile some of the best solutions to Spotify disk usage problem and an ultimate way to fix this problem forever.
Solutions to Spotify Excessive Disk Usage Problem
In this part, I will compile the possible ways to fix Spotify high disk usage issue. You can try all these methods and there might be one that works on your Spotify.
1. Reinstall the Spotify app
One of the reasons that cause Spotify high disk usage issues is that your application might have been out of date. Delete your Spotify app and reinstall it with the latest version of it, you can fix the issue by doing this.
2. Change cache location
Every time you play songs on Spotify, it will create caches on your computer. And these caches will be activated when you open the Spotify app, which may cause high disk usage issue. You cannot prevent Spotify from downloading cache, but you can change the location of cache files on other disk drives so that it does not affect the running speed of your computer system. Here's how to find the cache location and change it:
1) Go to Spotify app settings.
2) Scroll down to Offline Song Storage, and you can find the location of your current cache files. Default location on Windows:
C:UtilisateursUSERNAMEAppDataLocalSpotifyStorage
Default location on Mac:
/Users/USERNAME/Library/Application Support/Spotify/PersistentCache/Storage
Default location on Linux:
~/.cache/spotify/Storage/
3) Navigate to your operating system's File Explorer and then delete cache storage.
4) Return to Spotify and click CHANGE LOCATION to change the location of the cache files.
3. Disable Local Files option
If you have the Local Files option enabled, every time you use Spotify it will occupy your disk to load those files into the app. To resolve this problem :
1) Open Spotify on your desktop.
2) Go to Settings and scroll down to Local Files.
3) Disable the Show local files option.
4. Log out of Spotify
If you have connected Spotify to your Facebook account, it will continue to track your listening activities and post them to your social networks. So it would be better to turn it off to avoid high disk usage issues:
1) Open Spotify and go to Settings.
2) Scroll to Facebook.
3) Click LOG OUT OF FACEBOOK.
Ultimate Solution to Fix Spotify High Disk Usage Issue
If all these solutions above still can't fix the problem, is there still any way to get rid of it and reduce Spotify disk usage? Yes, with this workaround, you can listen to Spotify songs on your desktop and no longer have to worry about the disk usage issue.
With Spotify Music Converter , you can directly download any content from Spotify and then play it with any media player on your computer. All songs can be accessed without the Spotify app so you no longer face Spotify high disk usage issues.
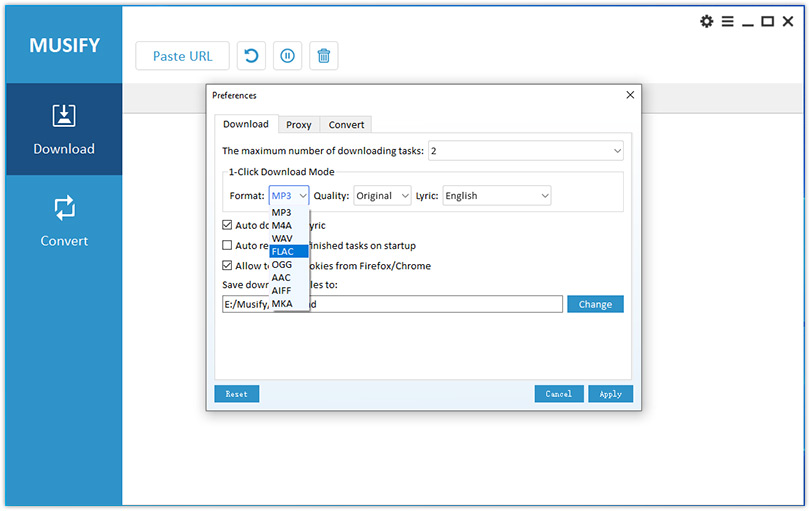
Spotify Music Converter is designed to convert Spotify audio files to 6 different formats such as MP3, AAC, M4A, M4B, WAV, and FLAC. Almost 100% of the original song quality will be retained after the conversion process. With 5x faster speed, it only takes seconds to download each song from Spotify.
Main Features of Spotify Music Converter
- Convert and download Spotify songs to MP3 and other formats.
- Download any Spotify content at 5X faster speed
- Listen to Spotify songs offline sans Premium
- Fix Spotify High Disk Usage Problem Forever
- Backup Spotify with original audio quality and ID3 tags
Step 1. Launch Spotify Music Converter and import songs from Spotify
Open Spotify Music Converter software and Spotify will be launched simultaneously. Then drag and drop tracks from Spotify into Spotify Music Converter interface.

Step 2. Configure Output Settings
After adding music tracks from Spotify to Spotify Music Converter, you can choose the output audio format. There are six options: MP3, M4A, M4B, AAC, WAV and FLAC. You can then adjust the audio quality by selecting the output channel, bit rate and sample rate.
Step 3. Start Conversion
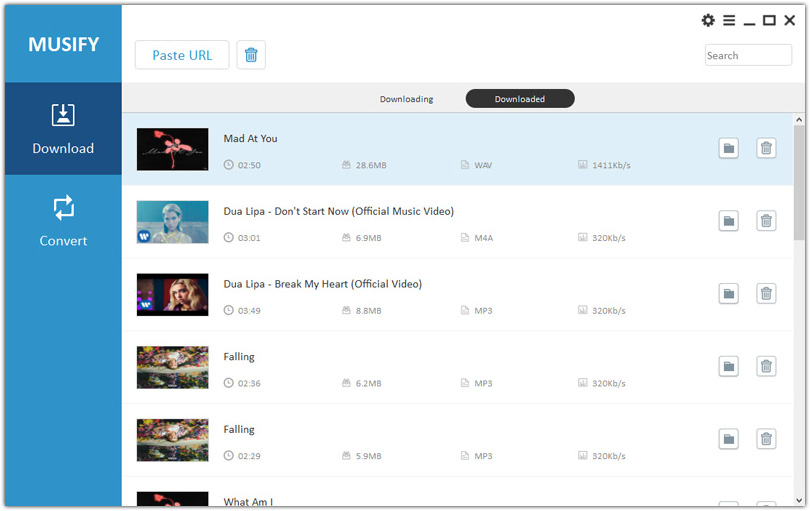
After all settings are completed, click "Convert" button to start loading Spotify music tracks. After conversion, all files will be saved in the folder you specified. You can browse all converted songs by clicking “Converted” and navigating to the output folder.
Step 4. Play Spotify on Your Computer Without High Disk Usage Issue
Now you can play the downloaded Spotify songs on your computer without the app, and thus you will no longer face the Spotify high disk usage problem. Now you can listen to songs and do everything else on your computer without being bothered by Spotify.